Wednesday 22 March 2023

Carpets

Now that I had covered the interior of my Midget with soundproofing it was time to fit the carpets.

I ordered a set from Prestige Autotrim Products Ltd. This included both front and rear sets. I also ordered the underlay for extra soundproofing and comfort.

The majority is very easy to fit as it is so well cut to fit. But there are a few tricky areas like the wheel arches and the box chassis sections in the boot.

So with spray adhesive ready you coat both surfaces and leave for a few minutes until they go tacky and then fit the carpet to fit. I haven't stuck down every part just the ones that don't lay flat. So the ones around the box sections, wheel arches and the boot sections for example.

Sorry for the lack of photo's of the process but I was so focused on getting them to fit I only really have before and after.


Realised I needed to fit the seat belts as part of the process as you need to fold in the underlay and the carpet to make sure they say down and in the correct shape and place.


You also need to make the holes for the seat bolts.


I'm not overly happy with the wheel arches. Found it difficult to get the shape just right. I might have another go when I feel like tinkering with it.


I'm happy with the overall finish. Not many jobs left now.

Friday 17 March 2023

Dashboard Fitting

I always knew what I wanted the dash to look like. I really didn't like the black wrinkle effect that was standard and with the old English white I think it sets the gauges off really well.

When I first saw the dash painted I knew I had made the right decision.


The first job is to fit all the gauges, lights and switches. As I was getting them all together I remembered the indicator surrounds were in a right mess. The rubber had completely disintegrated and you cannot buy these new. I had to come up with a way to make them good again. 

Thankfully the cardboard cylinders were just about ok. Then, after many hours of searching and brainstorming, found these rubber blanking end caps on ebay:

Only a couple of pounds each.


With some trimming of the lip they seemed to fit well.


Next issue was the green filter. Again the old one was too far gone, or totally gone as I could only find one. I bought some heat resistant green transparent acetate sheet for another couple of pounds and rather than cut a circle and stick that to the cylinders like they did originally, i thought it was easier just to cut a rectangle to cover the whole area.


I used a hole punch to make the two holes once measured.


Slot it on and can carry on with fitting the rest of the instruments.


I'm sorry that I didn't take photo's of each gauge and switch, but I was so worried about scratching the dash's new paint that I just had to focus on getting them all in ok. For the four main gauges I bought new rubber seal that sits between the gauge bezel and the surface of the dash to ensure a snug fit and less rattling.


Now some of you eagle eyed folk might have noticed a little modification I made to the windscreen pump tubes. When I first fitted this it didn't work. Not sure if it was faulty. A little research shows they are rubbish which is why many people fit electric pumps. However I worked out that you can get them to work really well by adding a small valve on the tube from the pump to the jets.


Again found these on ebay for a few pounds and they really do work, so that even when you push the pump button once you get a very strong stream of screen wash on the windscreen. 

Another upgrade that I decided to make was after I fitted everything I noticed the lights on the gauges were really dim. I've heard this mentioned before so invested in some LED bulbs specially designed to replace the old bulbs. 

And oh do they make a massive difference as you can see below.


I also wasn't sure if the indicator lights would be too bright as I had no idea if the green sheets had the right amount of transparency. But having had the car out in the bright of a sunny day I could see the indicator lights just right. 


Once you have all the gauges and switches and lights in place and correctly wired up (Refer to this diagram for help: https://theleisure.files.wordpress.com/2009/03/wiring-2.jpg) you can now fit the dash to the chassis.

Unfortunately you cannot do that until you have fitted the crash rail. I'll cover the restoration of the rail in another post along with all the other interior trim that had to be restored. 

The crash rail isn't that hard to fit with the dash lowered as below. You need to slide in the 10 stud plates. Move them so that they line up to the holes and push in and then tighten all the nuts. 


After the crash rail is fitted you can lift the dash into position. There are just three bolts that hold the dash in place and fairly easy to locate. 


The more fiddly job is fitting the side bracket that holds the dash right back into the position and stops it vibrating.


You have to line up the bracket so it lines up with both holes allowing you to fit the screw and bolt.


Screw goes to the dash and bolt to the a post. 


There are also two metal strips that pull the middle of the dash towards the bulkhead and hold it in place. They are held in place with two self tapping screws. You can see one of them in the photo below.


Think the dash looks really good. You may notice the black beading that goes around the instruments section of the dash below. This is just some round solid rubber cord from eBay. It is just stuck to the underside of the dash at each end and the elasticity keeps it in place. 

The reason why I came up with this was because when it came back from the paint shop you could see the gap between the two welded sections and it didn't look good. I think it would have been harder to see if I'd kept the black wrinkle paint, but the white really showed it up. I Like the way it looks though.

Tuesday 14 March 2023

Soundproofing

There's a bit of a split of opinion on whether to cover the inside of your Midget in soundproofing. 

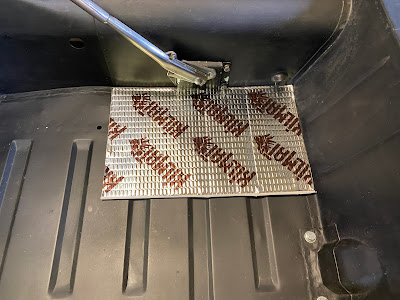
I was all in! I wanted to get close to achieving a seemingly solid build quality and certainly didn't want to hear anything other than the engine and wind. I was also planning on installing a Bluetooth speaker and needed the cockpit as quiet as possible.

Bought a middle of the range brand and got to work.

Seemed a bit of a shame to cover the clean chassis paint, but I had to keep reminding myself it all gets covered in carpet anyway which was also the reason I didn't spend a load of cash painting it in Old English White. Don't know why people do that. 

The aim is to cover the main parts where vibration and noise can pass into the cockpit. I quite enjoyed this job. 


You just peal the protective paper off the black sticky stuff and press down on to the area.


Then using the roller make sure there are no air bubbles and it is stuck down. 


And repeat everywhere you want to.


Cutting this stuff to fit isn't too bad if you have an old pair of scissors. As you'll have plenty of awkward shapes to deal with.


I also put one sheet inside the door and even this one piece makes a big difference to the sound of the door when you close it. It stops the tinning sound and makes it more of the thudding sound.


Now I can fit the carpet and trim. Getting closer!

Sunday 12 March 2023

Fitting Chrome Bumpers

When I bought my MG Midget the prior owner included a set of bumpers that were not in a good state.

The chrome was very pitted or flaking and the mounting brackets and other steel parts were very rusty.

I thought I would be looking either a brand new set or a serious bill to restore them.

As the years ticked by I did keep an eye on auction sites to see if anything would come up. Most of the time ones that did come up where in a similar condition to mine or worse or just too expensive for second hand.

But then one day I found two adverts on eBay, one for the front and one for the rear bumper including overriders. Both adverts were for the same person. Initially they seemed in good condition and at a reasonable price. 

Sadly on closer inspection the front bumper had a couple of bends in it. But the rear looked good to me and the guy was down the road from my sisters house.

So I made an offer and he accepted. My sister went to pick it up for me and got chatting. Then she called me to say he'd thrown in the front bumper for no extra cost. 

When they arrived I was actually really pleased as the were in really good condition...apart from the two bends in the top edge of the front bumper. 

I took a gamble and had a go at straightening them out in the vice with wooden blocks to protect the chrome from getting damaged. Thankfully I managed to mostly get the bends out. 


Looking close up the overriders were pitted but from a distance they looked shinny and the metal was in very good shape. I have them all the treatments I knew, aluminium foil rolled into a ball and with water rub all over. Use very fine wire wool works wonders as well. Finished off with chrome polish and all the chrome has come up well.

Important to make sure the rubber on the overriders hasn't perished. Need to replace if it has.


On the rear of the bumpers I cleaned off all the old grim and rubbed down with an oily rag.


I remember how hard it was to take all the old fixings off. Many had rusted solid and needed to be cut with an angle grinder where possible. This is better than allowing the bolts to rotate and damage the shaped bolt holes in the bumper that are there to stop the bolt rotating.

But now time to rebuild. Rest the bumper on the overrider and place all the cup washers over the holes. 


Place the bracket on top. Then insert the bolt with washers. I wouldn't tighten this up fully yet, as you will need to adjust the bumper left or right when it is on the car.


Do the same for all the other nuts and bolts.


Time to mount the bumper to the car!


Then place the rubber stoppers on the chassis bumper brackets. 


Add the large washers.


Then put the bumper bracket on the chassis bracket and hold in place with one hand...


and tighten the nut on with the other.


Now this is where you need to be careful not to scratch your paint and why you shouldn't tighten all the nuts up until your absolutely sure you have the bumper in the right place.


But once you do it makes a huge difference!


The rear bumper is very similar. There are two brackets this time.


With both brackets on it is time to fit it to the car.


But first you need to fit the mount supports which are attached from inside the boot.

The replacement boot floor that I bought didn't have the holes predrilled for the mount, which meant I had to do it. Thankfully I did have the hole in the rear valance to help guide me. 

So I needed to mark the holes out and drill away!


Hope they are in the right place.


It did take a bit longer than I thought it would to get the bolts into the bracket, but when they were all tightened up the hole in the valance also lined up. Result!


I then painted the outer bracket two tone.


and then fitted it with the chrome fittings. Looks very nice!


Ready to finish mounting the bumpers.


Access was actually quite easy when tightening it all up thankfully.


And they look really good. Not perfect but solid and perhaps one day I'll get them all fully re-chromed.