Monday 15 January 2018

Rear end panel repairs

Although it has been a while since I have updated my blog I have been getting on with the usual rusty panels removal.

First up was some further work on the rear end panel where I had stopped from the last time I was working on this section, as you can see below.


I wanted to finish off each corner, which was... yes you have guessed it, make a template and weld it in!


and the other side...


It was clearly much worse. You can see the seam coming apart above where the rear wing joins to the rear panel. So I decided to do this in two parts because it would be too difficult to accurately shape the metal to fit perfectly.


I'll close that gap and the seam next time I work on this area.

Friday 29 December 2017

Left Hand Rear Wheel Arch Repairs

Determined to keep progressing with the car, I spent some time today in the garage continuing to repair the rear of the MG Midget in preparation for the new boot floor panel. Today I focused on the left hand side rear wheel arch. This side is certainly not as bad as the right, but does have a few issues that need to be sorted out.


On first inspection I thought this would be a quick repair, but through the hole created by the rust I could see some surface rust in the tubular section behind, so I cut out more than I originally planned.


So with rust converter and paint brush in hand I coated the inside as best as I could.


Once it was all dry I added a top coat of chassis paint to hopefully seal it for many years to come. Once that had dried I could cut out a template and weld a new piece in.


Came out pretty good too! Next up was reinforcement arch which was slightly worse than the right hand side. The metal was very thin and rust and needed to be cut out and replaced.


The new strip fitted well and I have found welding upside down has become much easier since I cleaned the wire feeding spindle in the welder, so I now get a much more consistent flow of wire.


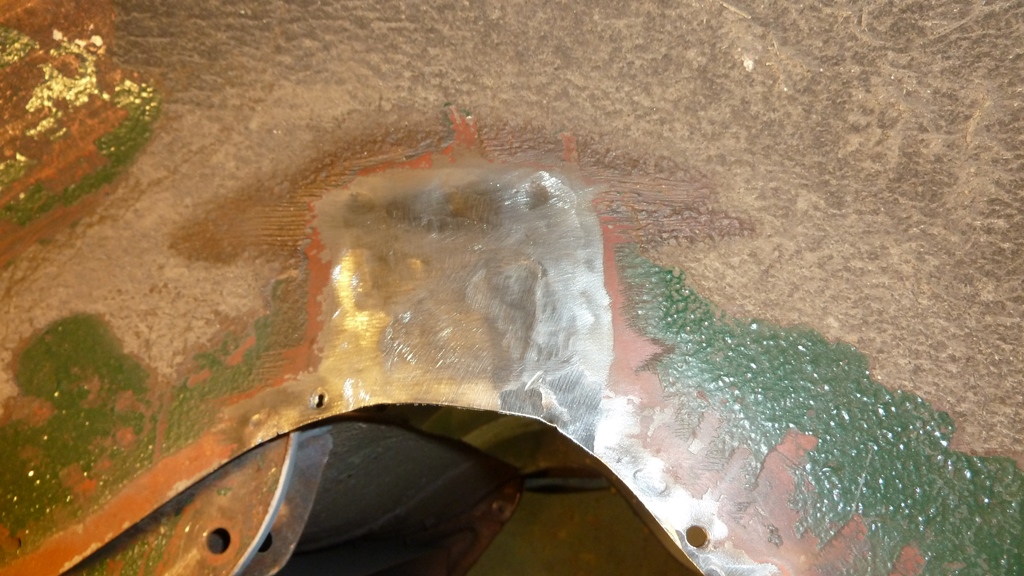
The final job for the day was another section of the wheel arch.


This didn't take long and within 15 minutes was all fixed up.


I think the next job will be to fix the curved inner wheel arch that I was so happy with on the right hand side.


Monday 18 December 2017

Boot Floor Test Fitting

I really don't know where the last two months have gone, but getting into the garage has just seemed to be very difficult lately. Sometimes it just goes that way, but once again it is the readers of the blog that encourage me to get back to the task. I thank you all!

The current objective is to repair the whole boot floor and rear wheel arches which were and, in places still are in a terrible state. So after sorting out the suspension bump stop plate on the right hand side I really wanted to turn my attention to test fitting the new boot floor repair panel.


Before I could put this in its correct place the bump stop plate on the left hand side needed to be removed, which really did need to be done because there was some rust damage, certainly not as bad as the right hand side but all the same I can't leave it as it is.


It is a relief that the rust is limited in this area. So with the wire brush attachment and the weld drill bit  I cleaned up the whole area and removed the stop plate, which I will clean up and weld back on when the new floor panel is in place.

Once that was all done I started to measure up as I needed to cut the new panel to fit the rather large hole.


Once cut I was so happy to see that the new panel slotted into place and all lined up with minimal effort!


Quite a bit of welding to do mind and there is still loads of work to be done before this finally gets attached, but it does look good! I was also pleased to see that the bottom lip repair I did some months back to the rear panel married up nicely also.

Tuesday 3 October 2017

Bump Stop Plate Repair

This is one of the last major repairs to make to the right hand rear wheel arch. It requires removing, cleaning off the rust and welding back into position when the boot floor is fixed in place.


You can see that the rust was slightly more than surface rust. But with my spot weld drill bits it came off without too much trouble. Trouble was the state of the flange it was attached to.


I realised I was going to have to make a new flange, which meant exposing it completely and that needed to happen anyway because the new floor was going here. So I started cutting it all back...


...and made a new flange.


and welded it in!


I also stripped back and repainted on some rust converter and I'll paint on some black chassis paint tomorrow to seal it all up properly.

Next job is to sort out the rear lights before moving on to the left hand side of the car for the first time during the restoration!!!!

Inner Wheel Arch Repair

I was quite proud of myself for making this repair panel, so I was looking forward to welding it in.


So there I was feeling all proud and thought that I should try to see how the boot floor extension panel I got from Moss fitted.

I very quickly realised I had made a mistake.


The curve I created followed the rusty original which must have moved from its correct position. I should have used the extension panel as a guide because they are designed to be welded together and need to fit snugly and allow the extension panel to sit low enough so that it is level with the boot floor. Mine was too high! 

So I had to cut into the curve and straighten it and re-weld it in the correct position.


Lesson learnt for the other side which will also need the same fix.