Monday, 13 January 2014

Wheel Arch repairs

As some readers of my blog and other MG Midget restoration enthusiasts will know that before welding in the outer rear bulkhead I have to make good the wheel arch where is connects to the bulkhead, as shown here:


So where do you go from here? Well I thought I would give a step by step guide as to how I went about it.


Lucky I love these I'll be needing the cardboard!
Pressed up to left hand side which is less damaged
Drew line to highlight the edge
Measured in 1.5 cms
Followed 1.5cms gap all way round
Drew in line
Cut out

Checked shape on left hand side
Flipped over
Check curve again joining repair panel (made earlier)
New Steel
Best place for I reckon!
Mark out
Looks about right
Ready for grinding out
Nearly there
Looks good match, thanks to flap discs!
Might squeeze it in
Cuts to make flange
Flange should be ok 
Need to work out how to fill those gaps
Looking good
Think it'll fit
Little by little think I might just get there!

Friday, 10 January 2014

More metal in!!

Such a boost to start getting more new shiny metal in place. So here are some photos of the progress so far.


Blow out! No back plate
Will sort these holes out

Now started to work on the inner wheel arch.

Thursday, 9 January 2014

Welding needs to improve...more practice!

When I thought about this project I really thought that getting to grips with welding would be down to my abilities and practice. There is a part of me that wants to blame the welder but I can't, it is just my lack of experience and learning what I need in order to weld successfully. 

Just for anyone reading this who is keen to do a restoration project and has, like me, never welded before, find someone who has and get them to tell you every tool that you need and every little tip that they can show you. Then persuade the guy to spend as much time as they can with you, showing you what to do.

It has taken me literally months to get things sorted, but that is part of learning. So I guess I will share with you the hurdles that I have been through so far:
  • Friend lent me MIG welder and two gas bottles
  • Bought welding mask, gloves
  • Start to practice
  • Not arcing - this was caused by old wire that had oxidised
  • Was told to buy 0.8 wire to replace it
  • Bought 0.8 wire and new tips and shroud to go with it
  • New tips and shroud didn't turn up from ebay seller
  • Had to reorder tips
  • New tips were wrong type, but found old tip worked ok
  • Welding buddy set up welder and found I could weld in a straight line!
  • Ran out of gas of first bottle
  • Then weather got colder and wire stopped feeding ok.
  • Found out the tip was 0.6 and the hole shrank in the cold making wire feed slow
  • Ordered new 0.8 tips
  • Tried out new tips all seemed ok, good clean welds
  • Had a go at first weld on the chassis and immediately blew a hole in the metal
  • Welding buddy came back and reset the welder for me and told me to order some aluminium to use as a backing plate to help stop blow through during butt welds
  • Ordered aluminium from ebay
  • Tested weld on test butt weld and all went well
  • Tried out on chassis again...
  • ran out of gas on second bottle
  • no more gas!!
So I have learned so much in my restoration journey, which was the plan so I am happy really.

Monday, 9 December 2013

First Weld In Place

Yes tonight for the first time I have added some nice shiny new metal to my MG Midget. 
Damaged Area

So from this photo above you can see the extent of the damage to the wheel arch viewing from the inner sill. The complicated part of this is that there are so many panels coming together at this point.


Support Repair
This is the rusted support that connects the wheel arch in the background of the top picture to the inner section closest to you.


So I needed to make up a new section as shown above. (I'll have to upload a photo of this new part later) 

But you can hopefully get an idea how these parts fit together from this photo.

But before that I had to make up a small repair which you can seen partly welded in below.
First Weld!

I will tidy this up during my next session. But got it straight and in place which was my main concern. The welder was a little problematic. I really do need to work out how I can get it to be more consistent. Would help me enormously!

Tuesday, 3 December 2013

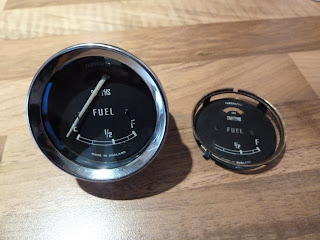
Fuel Gauge Repaired

I seem to spend a lot of time scrolling through ebay trying to find little bargains here and there. Two weeks ago a guy called Keith in the USA was selling an original second hand Smiths Fuel Gauge FG2530/70 face! 


Smiths Fuel Gauge FG2530/70 face

I really couldn't believe my luck as avid readers of my blog may remember that I ruined mine trying to clean it.

Smiths Fuel Gauge FG2530/70 face
Cleaning damage

So I made sure I won the item and set to work replacing the old face with my new purchase and I have to say that you can't help thinking that some things happen for a reason, as my completed fuel gauge looks way better than mine ever did!

Smiths Fuel Gauge FG2530/70 face
Ready to go
Smiths Fuel Gauge FG2530/70 face
Old face removed, all ok inside
Smiths Fuel Gauge FG2530/70 face
Old v's new
Smiths Fuel Gauge FG2530/70 face
New face fitted
MG Midget Smiths Fuel Gauge FG2530/70
Looking better than ever!

Monday, 18 November 2013

Bespoke Panels! What next?

I have been learning a new skill this evening, making bespoke new panels and repair sections. This is the only way that I am going to complete this project on my budget.

I had really hoped (yes I know stupid) that buying new panels and welding them in would be a little more straight forward, but of course you need to weld them to something other than rust, as you can see here from this photo.


Above is the right hand wheel arch, looking at where the arch panel comes down to meet the rear bulk head (currently removed). So I needed to make up a section to cover that rusted section as shown here:


So I have cut this out and made a new repair out of the sheet steel I purchased back in the summer. I thought no problem to weld this in now, but then realised I would have to make a new repair for this section in red first.


This meant that I had to remove a supporting section of the B-Post which has rusted through and needed a replacement made. So more cutting and shaping resulted in this:


Got to be said having a nice new repair section made by yourself is a good feeling and I cannot wait to get it welded in place, but there is still so much work to be done in this area that it will be a few more evenings graft before I get that chance.