Friday 23 November 2012

An Evenings Work

Just a quick update on work completed tonight.

So I started by cleaning up some more chrome and glass whilst my wife was working, which again came up really nicely.


MG Midget 1965 Restoration MG Midget 1965 Restoration

Later on I gave myself 1 hour in the workshop to finally get the dashboard removed which required me to get the heater cable, speedo, rev counter and indicators off.


MG Midget 1965 Restoration MG Midget 1965 Restoration MG Midget 1965 Restoration
MG Midget 1965 Restoration MG Midget 1965 Restoration

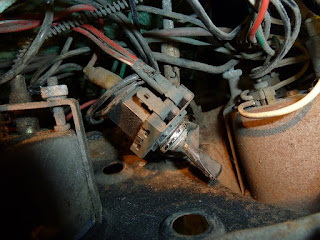
I then found something odd. Earlier in the week I noticed that connected to the dashboard where two switches labeled 'Starter' and 'Choke'. Both were pull switches. I wanted to trace the wires to see what they were connected to, but unfortunately they were only connected to each other and nothing else, any ideas?

MG Midget 1965 Restoration

If I had to guess it was at some point a early immobiliser that required both switches to be pulled before the car could be started.

Wednesday 21 November 2012

Learn from your mistakes

Over the past couple of nights I have been unable to get to the workshop, so I decided to clean up some of the parts that I have removed from the car instead.

I thought that a nice place to start would be the Smiths gauges. So with wire wool in hand I began to clean up the chrome and glass that was covered in black dashboard paint and general grime. I started with the fuel gauge and it was coming up very nicely. However there was a lot of dirt and dust on the inside of the glass and on the face. So I took the chrome surround off and cleaned the glass to almost new.

I then made my first real mistake of this project and decided the best way to clean the face of the gauge was to use a damp cotton bud.

MG Midget 1965 Restoration

I didn't realise that the 'artwork' was printed on with water soluble paint, which as you can see now means the car will never run out of petrol!

I have since found out that it is possible to send the gauge to a specialist to have it restored. Both www.speedoheads.co.uk and www.speedycables.com offer these services as well as complete refurbishment.

So with my new found knowledge of how to carefully clean my gauges I finished off the other two without further incident.


MG Midget 1965 Restoration MG Midget 1965 Restoration
I even tested the water temperature gauge by boiling some water, putting the thermostat in and watching the dial swing round was a brilliant feeling.

I had some time spare so cleaned up the ignition barrel as well.


MG Midget 1965 Restoration MG Midget 1965 Restoration

Monday 19 November 2012

Wiring Expeditions

Over the past few nights I have been trying to unravel the seemingly miles of wires connected to my dashboard.

Some of which are easy to identify, others are quite a mystery even with my trusty colour wiring diagram: https://theleisure.files.wordpress.com/2009/03/wiring-2.jpg

MG Midget 1965 MKII Restoration MG Midget 1965 MKII Restoration MG Midget 1965 MKII Restoration MG Midget 1965 MKII Restoration MG Midget 1965 MKII Restoration MG Midget 1965 MKII Restoration MG Midget 1965 MKII Restoration

Thursday 15 November 2012

The Leg Bone Connected to the Knee Bone....

MG Midget 1965 MKII RestorationYesterday evening I set out with a clear strategy in my mind about how I was going to tackle removing the dashboard, whilst documenting what all those little wires were and where they had to go back to. I even found a colour wiring diagram for my Midget's year to help me find my way. The steering column though was causing me a problem and that had to be removed to get the perfect access to the back of the dashboard.

I do remember reading somewhere during my research that Midgets are quite tight on space and can be tricky to work on. So on trying to remove the screws holding the steering column in place I found that the job would be made easier if I removed the radiator, even if it was something I had planned for the future. Checking my trusty second hand Haynes manual and after removing the hoses, it was just a matter of removing four nuts. Problem was that I could only find one nut and replacing the other three was a load of brazing around the two top bolts. Someone in the past must have lost three of nuts and decided the best way to secure the radiator was to put a hot torch and solder to it!

I have to admit I did prefer this to welding, as my experience at school during CDT classes reminded me that brazing was fairly brittle and after a couple of knocks with a mallet and screwdriver it broke and the radiator was free.

MG Midget 1965 MKII RestorationWell after all that I got a bit carried away and decided to remove the remaining front body work and exposed the front crossmember, which allowed me to properly get to the steering column and has left the engine nicely on view.

Having a quick look around, the front chassis looks in good condition. Also the engine looks like it hasn't been touched in years, everything from the leads, alternator, distributor and even the oil filter looks very dated. Kim from Magic Midgets said it was unmolested and I do wonder if the mileage of 4,450 is correct? Probably wishful thinking!

The lesson learned was that when setting out on trying to complete one job you never know the sequence of events that will connect you to other jobs. Try and focus on one job at a time. Next job...remove the steering column!!

Sunday 11 November 2012

Removal continues

Over the past few days I have been feeling increasingly more relaxed about this project. I think this comes down to the simplification of the task. By breaking the car down into its smallest sections possible it has allowed me to focus on the parts the need the most attention, which for this car is undoubtedly the floor as seen in previous posts.


I will certainly be needing the repair panel for the floor sections above including the crossmember. But I am hoping that the spring mounting repair panel (shown as 12 or 14) will be enough rather than having to replace the whole bulkhead which looks, on initial inspection, in good condition.


MG Midget 1965 MKII Restoration MG Midget 1965 MKII Restoration

The focus has been on the stripping down of the cockpit area, including windscreen and wipers, heating parts and general clips and trims. The dashboard is obviously very daunting which is going to require some major thought about the best way to ensure that all the wires are going to find there way back to there original locations.

The bulkhead trim is a real pain to get to without completely removing the dashboard which in turn will be easier to assess with the steering column removed. I am hoping that all those hours playing Tetris on the Gameboy will come in useful!!

Wednesday 7 November 2012

Jobs completed tonight

Just about to head off to bed, but thought I would give a quick update on what I did tonight.


MG Midget 1965 MKII Restoration
Removed the rear number plate holder, rear lights and housing, reversing & number plate light. Also took off the boot lid, fuel hose and two chrome hood or tonneau catches.
Then moved on to removing the nearside door hinges, both door striker plates and the gear stick housing.

On Saturday will be looking to work on removing the dashboard, windscreen and wipers.

My Friends Rusty and Patch

I am guessing this is one of the first low points, when you really get to look over the Midget and find these lovely examples...(click on images to enlarge)


MG Midget 1965 RestorationMG Midget 1965 Restoration


MG Midget 1965 RestorationMG Midget 1965 Restoration


MG Midget 1965 RestorationMG Midget 1965 Restoration


MG Midget 1965 Restoration
Were they looking for sardines?
MG Midget 1965 Restoration
                                                    
MG Midget 1965 RestorationMG Midget 1965 Restoration


MG Midget 1965 RestorationMG Midget 1965 Restoration


MG Midget 1965 RestorationMG Midget 1965 Restoration


MG Midget 1965 RestorationMG Midget 1965 Restoration


MG Midget 1965 RestorationMG Midget 1965 Restoration


MG Midget 1965 RestorationMG Midget 1965 Restoration

Tuesday 6 November 2012

The Arrival

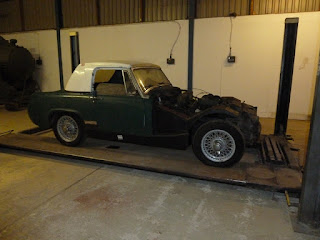
So at long last my MG Midget has arrived at the workshop during the late hours of Monday night.

It was such a good feeling that I almost forgot how cold I was. Huge thanks must go out to my friend James Shopland who has helped me so generously and to Kim Dear of Magic Midget who has been very helpful and kind during this purchase.

I did have a better look over the car and there are certainly some bad areas that need attention, most of which I was already aware of, but on the whole there are many good points with the overall condition which has given me a real boost about this project.

The engine will definitely need an overhaul as we suspect it has seized, but there was some sort of oil in the sump so we are hoping that it is down to the fact that the engine has not been started in years, rather than mechanical failure. Have to wait and see on that one.

So now the stripping down and documenting beings! (click on images to enlarge)
MG Midget 1965 MKII MG Midget 1965 MKII


MG Midget 1965 MKIIMG Midget 1965 MKII


MG Midget 1965 MKIIMG Midget 1965 MKII


MG Midget 1965 MKII MG Midget 1965 MKII